JavaScript is calling

Written by Jeroen van Veen on 4th April 2017
Calling from a browser to a GSM using your own private GSM network, an Odroid, Asterisk, OpenBTS, WebRTC, and SIP.js
About Software Defined Radio
I first read about the OpenBTS project and its appliance at the Burning Man festival some years ago. I found it an interesting idea that anyone would be able to create his own decentralized mobile network. OpenBTS relies on Software Defined Radio (SDR). The OpenBTS book describes SDR as following:
“This means that radio hardware is no longer designed around a specific application; it is completely up to the host to define the implementation, allowing anyone to create radio applications purely in software.” – Harvind Samra, Cofounder of the OpenBTS project, cofounder and CTO of Range Networks
Instead of having hardware that dictates a radio protocol (Bluetooth, WiFi, GSM, etc.), an SDR allows anyone to dynamically shape radio protocols with nothing but software. SDR’s have been in use by the military for about 20 years, but are becoming more widespread in the consumer market. To get an idea of what an SDR can do, check out some interesting products/Kickstarters, like the USRP B200, BladeRF or the LimeSDR.
It wasn’t until a few months ago that I stumbled upon the much lower-cost USRP B200 SDR device. The USRP B200 can be used as a backend for OpenBTS. OpenBTS is comprised of several services and is basically a bridge between the raw GSM radio traffic and VoIP. It uses Asterisk as its VoIP backend.
One of my personal learning goals at Spindle this year is to learn more about VoIP and Asterisk, so I figured that building my own BTS would be a great opportunity to get started with both Asterisk and OpenBTS!
Ordering hardware
So I ordered the following hardware from my Spindle study budget:
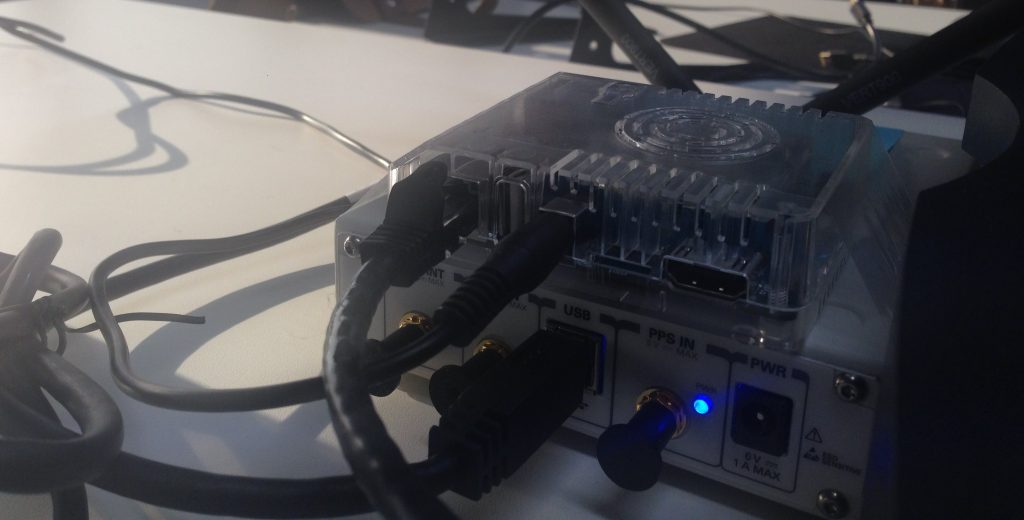
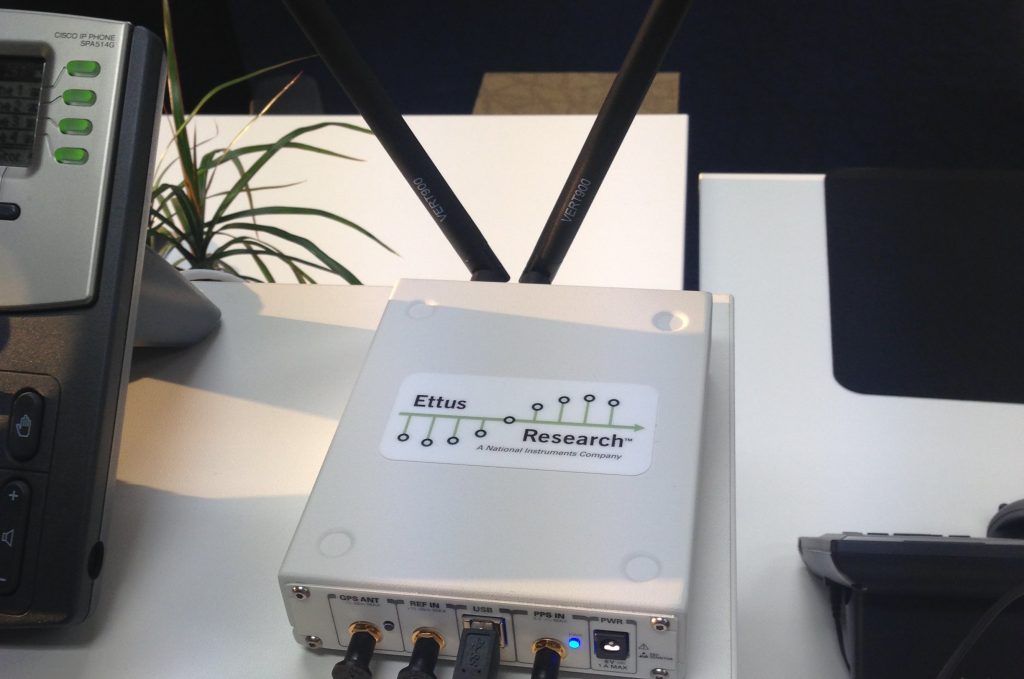
- USRP B200 SDR Kit 1×1 (70 MHz – 6GHz) with USB3 Cable
- USRP 24w Power Supply – ETTUS
- Steel Enclosure Accessory For USRP
- VERT900 Vertical Antenna (824-960 MHz, 1710-1990 MHz) Dualband (2x)
Mounting the USRP in the steel enclosure was quite easy. The only bump was that the caps on the connectors were very difficult to remove. OpenBTS can be used without special SIM cards (using ‘open registration’), but probably the best thing to do when starting with OpenBTS is to order some preprogrammed custom SIM cards for OpenBTS and a SIM programmer + adapter to roll your own SIM’s once you’re up-and-running with a dozen phones. I ordered the following from a Dutch SDR supplier:
- SIM card preprogrammed standard (4x)
SIM card programmed for use with OpenBTS with standard settings MCC=001, MNC=01, IMSI starts with 00101. A label is attached to each SIM with all programmed settings, including ki. - SIM programmer
Full size SIM card programmer. You can use this to program the SIM’s while they are still embedded in the full size holder (credit card sized). You have to place the SIM back into the cardholder or an adapter to use this programmer to (re)program SIM’s after they have been taken from the full size cardholder and have been used in a phone. - SIM ADAPTER 1 MmN-F
Mini/micro/nano SIM card to full size adapter card. Full size adapter card with slots to put in a minisim (standard size) microsim or nanosim (3FF, 4FF) Professional SIM card adapter (plug-in, mini, micro, nano SIM to full size) This is a professional adapter card to insert ID-001 (plug-in, 2FF) SIM cards or micro SIM (3FF) or nano SIM (4FF) cards into a full sized card reader slot.
Notice that you should check the SIM format of your test phones before ordering.
Another thing I needed was a device to run the whole stack on. I started out with my laptop, but I wanted the BTS to be up and running all the time without needing my laptop around. The USRP B200 has a USB3 interface, which pumps a lot of data around. My first thought was to get an Odroid XU4, which has two USB3 ports and enough performance to run Asterisk and OpenBTS. So I ordered the following from a German supplier:
- ODROID-XU4, 2GHz Cortex A15 & A7
- ODROID-XU4, Gehäuse, transparent
- ODROID-XU3/XU4 eMMC-Modul, 64GB
The eMMC module already has Ubuntu preinstalled on it, which makes it quicker to get up and running. If I would have had more spare time, I would rather setup Archlinux Arm.
Installing software
This is not a precise installation manual, because it mostly depends on the environment you want to run it in. It only describes some of the troubles I went through, so you won’t have to 🙂
System packages
This is not a curated list, but you definitely need the following packages:
Archlinux
pacman -S gcc5 python2-pyzmq rsyslog sqlite zeromq readline gcc5 screensystemctl enable rsyslog.service
Ubuntu
apt-get install sqlite3 libzmq3-dev libzmq3 libsqlite3-dev libreadline-dev libfftw3-3 libfftw3-dev libosip2-dev uuid-dev libjansson-dev libxml2-dev libncurses5-dev libvorbis-dev xmlstarlet libpjproject-dev libsrtp0-dev libssl-devLibUHDLibUHD
At first, you need to have a driver for the B200 itself. The driver is called libUHD, and supports several SDR’s. On my Archlinux laptop it was quite easy to build and it worked straightforward. Setup was like:
mkdir~/projects/radiocd ~/projects/radiomkdir workarea-uhdcdworkarea-uhdgit clone https://github.com/EttusResearch/uhdcduhdgit checkout release_003_009_005cd host mkdirbuildcd buildcmake.sudomake installsudo ldconfig# Add `export LD_LIBRARY_PATH=/usr/local/lib` to .zshrc/.bashrc if it’s not there yet.sudoecho "/usr/local/lib" >> /etc/ld.so.conf
On the Odroid, I had some trouble with libUHD not being able to find the device after compiling. This looked to me like an usb-related issue (despite the udev rules being there). I had more luck installing straight from the Ettus ppa:sudo add-apt-repository:
sudoadd-apt-repositoryppa:ettusresearch/uhd sudoapt-get updatesudoapt-get installlibuhd-dev libuhd003uhd-host
Once the driver is installed, you should perform the following actions to check whether the device is recognized properly:
# Download the UHD FPGA images oncesudouhd_images_downloader# Installudevrules forusbconnectivity oncesudo cp /usr/local/lib/uhd/utils/uhd-usrp.rules /etc/udev/rules.d/sudo udevadmcontrol --reload-rulessudo udevadmtrigger# Check connectivity after connecting the device to a USB3 port,uhd_usrp_probe
Everything is fine when you see some device statistics passing by.
Congratulations! You just installed the SDR driver.
OpenBTS
OpenBTS is a bit picky about the libraries it requires. Let’s create a working directory for its dependencies first:
cd ~/projects/radiomkdir-pworkarea-openbts/libs
Then check out and compile liba53. This is a stream cipher that takes care of encrypting GSM traffic:
cdworkarea-openbts/libsgit clone git@github.com:RangeNetworks/liba53.gitmakesudomake install
Now let’s build ORTP. This library handles audio streams. You need version 0.18.0. Using a newer version either results in a compile-error or ends with an OpenBTS crash at the moment when you start a RTP stream by picking up the phone:
cdworkarea-openbts/libsgit clone git://git.linphone.org/ortp.gitcdortpgit checkout 0.18.0shautogen.sh# No need for thelibsrtpdependency./configure --with-srtp=nonesudomake installcd ..
OpenBTS and its participants, smqueue and sipauthserve, use an old debugger library that produces coredumps. This library builds fine on Intel chipsets:
cdworkarea-openbts/libsgit clone git@github.com:RangeNetworks/libcoredumper.gitcdlibcoredumper wgethttps://storage.googleapis.com/google-code-archive-downloads/v2/code.google.com/google-coredumper/coredumper-1.2.1.tar.gztarzxfcoredumper-1.2.1.tar.gzcd coredumper-1.2.1patch -p0 < ../fix_from_scratch_build.patch./configuremakesudomake install
You need to remove libcoredumper from the source instead, when building for the Odroid/ARM. Libcoredumper doesn’t work at all on ARM chipsets. In either case, you would need to checkout OpenBTS anyway, so here we go:
cdworkarea-openbts/git clone git@github.com:RangeNetworks/openbts.gitcdopenbtsgit submodule initgit submodule update
Then for ARM builds, we are going to remove libcoredumper from OpenBTS and its dependencies. Grep for `WriteCoreDump` and `coredump` and manually remove the references from:
CommonLibs/UnixSignal.cppapps/Makefile.inapps/MakefileCommonLibs/Makefile.inCommonLibs/Makefile.am
For the Intel chipset build, we could decide to use the default transceiver software that comes with OpenBTS. The transceiver is the part that sits between the radio and the UDP traffic. There is also an alternative transceiver, which can be used together with OpenBTS; it’s called OsmoTRX. This transceiver seems to have more active development going on and has SIMD support for ARM chipsets. This is somewhat of a requirement to keep up with the massive amount of data that comes from the SDR. So we use the OsmoTRX transceiver either way instead of the default one:
cdworkarea-openbts/libsgit clone git://git.osmocom.org/osmo-trxcdosmotrx autoreconf-i# Only use --with-neon on ARM to get SIMD support../configure --with-neonsudo make install
Finally, we can build OpenBTS itself. Notice the CXX and CC flags that force the usage of GCC version 5. On Archlinux GCC6 is the default, but OpenBTS fails to build with version 6, so we force the usage of GCC5. On Ubuntu, GCC-5 seems to be the default, so you probably don’t need these flags there. The PKG_CONFIG_PATH was needed on Archlinux, otherwise it wouldn’t find libUHD:
cdworkarea-openbts/openbts./autogen.shCXX=g++-5 CC=gcc-5 PKG_CONFIG_PATH=/usr/local/lib/pkgconfig./configure --with-uhd sudomake installsudo ldconfig sudo mkdir/var/lib/OpenBTScd /etc/OpenBtssudosqlite3 -init ./OpenBTS.example.sql /etc/OpenBTS/OpenBTS.db".quit"
SIPAuthServe
“SIP Authorization Server (SIPAuthServe) is an application that processes SIP REGISTER requests that OpenBTS generates when a handset attempts to join the mobile network.”
So, without SIPAuthServe, a mobile phone wouldn’t be able to join the new network. We install it with:
cdworkarea-openbts/git clone git@github.com:RangeNetworks/subscriberRegistry.gitcd subscriberRegistrygit submodule initgit submodule update
On ARM, we need to remove the references to coredumper (WriteDump + header + linker info) again. Grep for it and remove the references.
Then proceed with:
shautogen.shCXX=g++-5 CC=gcc-5 ./configuresudomake install# The service expects this file to exist. It comes from liba53.sudoln -s /usr/local/sbin/comp128 /OpenBTS/comp128
SMQueue
“SIP MESSAGE Queue (SMQueue) is an application that processes SIP MESSAGE requests that OpenBTS generates when a handset sends an SMS. It stores the messages, schedules them for delivery in the network, and reschedules them if the target handset is unavailable.”
To install:
cd workarea-openbts/git clone git@github.com:RangeNetworks/smqueue.gitgit submodule initgit submodule update
On ARM, we need to remove the references to coredumper (WriteDump + header + linker info) again. Grep for it and remove the references.
Then proceed with:
shautogen.shCXX=g++-5 CC=gcc-5 ./configuresudomake installsudo mkdir/var/lib/OpenBTS
Asterisk
You could probably just use the default Asterisk version that comes with your repo, instead of custom building Asterisk. The OpenBTS docs say that OpenBTS is known to work with Asterisk 11, but so far I’ve tested successfully using both Asterisk 11 and Asterisk 13, using the chan_sip driver. Asterisk 13 has better WebRTC support, so we just pick Asterisk 13. To make a custom build with Asterisk 13, we need to ensure that all required dependencies are in place:
cdworkarea-openbts/libsgit clone git://github.com/asterisk/pjproject pjprojectcdpjproject./configure --prefix=/usr --enable-shared --disable-sound --disable-resample --disable-video --disable-opencore-amrCFLAGS='-O2 -DNDEBUG'make depsudomake installsudo ldconfigcdworkarea-openbtsgit clone https://github.com/asterisk/asterisk.gitcd asteriskgit checkout 13.14# `--without-libedit` fixes an annoying CLI utf8 typing issue../configure --without-libedit
Also, there is a handy make menu, which you can use to see which modules Asterisk is going to build:
make menuselectThe default menu selection should be fine. I didn’t check for things like VP8/Opus support for now, which WebRTC is capable of using. Your best bet is probably to modify/select it from make menuselect, before actually compiling. Then proceed with:
sudo make install
This should build and install Asterisk. It could be complaining about missing dependencies, in which case you would need to install those first using your repo’s packages. What I do most of the times when I get a compile error like that, is to internet search for the referenced header file, which most of the times reveals the accompanying package. After building, install the default example configuration:
sudomake samplessudomake config
Tip: this is not mandatory, but if you would like to run Asterisk as another user:
useradd -d /var/lib/asterisk asteriskpbxvim /etc/sudoers# Uncomment: %wheel ALL=(ALL) ALLvim /etc/group# Add asteriskpbx group to wheel: wheel:x:10:root,asteriskpbxchown -R asteriskpbx:asteriskpbx /etc/asterisk/chown -R asteriskpbx:asteriskpbx /var/lib/asterisk/chown -R asteriskpbx:asteriskpbx /var/spool/asterisk/chown -R asteriskpbx:asteriskpbx /var/log/asterisk/chown -R asteriskpbx:asteriskpbx /var/run/asterisk/
Next, we are going to generate TLS/DTLS keys for our WebRTC support. Replace the IP with your own LAN IP. Use a dummy pw, like ‘foobar’ when asked for it:
sudo mkdir /etc/asterisk/keyscd contrib/scripts./ast_tls_cert -C 123.123.123.123 -O "somename" -d /etc/asterisk/keys/
To allow WebRTC, we need to enable SIP over websockets and STUN support, edit the following files:
vim /etc/asterisk/rtp.conf

[general]
rtpstart=10000
rtpend=20000
icesupport=yes
stunaddr=stun.l.google.com:19302
vim /etc/asterisk/res_stun_monitor.conf[general]stunaddr=stun.l.google.com:19302stunrefresh= 30vim /etc/asterisk/http.conf[general]enabled=yesbindaddr=0.0.0.0bindport=8088tlsenable=yestlsbindaddr=0.0.0.0:8089tlscertfile=/etc/asterisk/keys/asterisk.pemtlsprivatekey=/etc/asterisk/keys/asterisk.pem
Next, we are going to add extensions that are allowed on Asterisk. We are going to add two mobile phones that will be connected through OpenBTS and two softphones that will connect through a browser:
vim /etc/asterisk/sip.conf[general]udpbindaddr= 0.0.0.0:5060realm =123.123.123.123 ;replace with your Server's Public IP Addresstransport =udp,ws,wss externaddr=123.123.123 ;replace with your Server's Public IP Addresswebsocket_enabled = true[optionsBTS](!)type=friendcontext=from-internaldtmfmode=rfc2833canreinvite=noqualify=no ; openbtsdo not support OPTIONinsecure=port,inviteallow=gsmhost=dynamic[optionsWebRTC](!)type=friendhost=dynamiccontext=from-internalvideosupport=yesencryption=yesavpf=yesforce_avp=yesicesupport=yesdirectmedia=nodisallow=allallow=ulawallow=alawallow=gsmallow=opusallow=vp8dtlsenable=yesdtlsverify=fingerprintdtlscertfile=/etc/asterisk/keys/asterisk.pemdtlscafile=/etc/asterisk/keys/ca.crtdtlssetup=actpassnat=force_rport,comedia[1000](optionsWebRTC)secret=12345dial = SIP/1000[2000](optionsWebRTC)secret=12345dial = SIP/2000001011772956952[IMSI123456787890123](optionsBTS)callerid=6055551231[IMSI123456787890124](optionsBTS)callerid=6055551232
Now you have two WebRTC clients defined and two phones that can connect through OpenBTS. Next we’ll setup a simple dial plan, which allows Asterisk to dial in on the defined extensions:
vim /etc/asterisk/extensions.conf[from-internal]; For Testing Audioexten => 1111,1,Answer()same => n,Playback(demo-thanks)same => n,Hangup(); For Testing Audioexten => 6003,1,Answer()same => n,Progress()same => n,MusicOnHold()exten => 6055551231,1,Dial(SIP/IMSI123456787890123@localhost:5062)exten => 6055551232,1,Dial(SIP/IMSI123456787890124@localhost:5062)exten => 1000,1,Dial(SIP/1000)exten => 2000,1,Dial(SIP/2000)
(!) Notice that you must replace the mobile phone’s IMSI with the ones from your OpenBTS registration in both sip.conf and extensions.conf. The best way to check the IMSI of connecting phones is in the OpenBTS console, but we’ll get to that later. First we’re going to fire up OpenBTS and its minions! I’m going to use screen for this to keep it simple for now:
sudo-sscreen -Sosmotrx osmotrx-f<ctrl a+d (escapes out of the screen)>screen -Sopenbtscd /OpenBTS./OpenBTS<ctrl a+d (escapes out of the screen)>screen -Ssipauthserve sipauthserve<ctrl a+d (escapes out of the screen)>screen -Ssmqueue smqueue<ctrl a+d (escapes out of the screen)>screen -S asteriskasterisk -cvvvvv<ctrl a+d (escapes out of the screen)>screen -list # shows all screens
So, now we should basically be running the whole stack.
Operating OpenBTS
First let’s attach to the OpenBTS CLI:
screen -ropenbts# reattach back to theopenbtsscreen
Transmission of radio is regulated by the Agentschap Telecom in the Netherlands. The upper 5 MHz of the 1800 MHz band is available (1875 – 1879,9 MHz) here to use without license for applications like a small picocell/BTS. Maximum output is 200 mW. GSM uses so-called ARFCN’s as channels. We need to pick a channel of which the downlink falls within these boundaries, in order to comply with local legislation. The ARFCN’s that can thus be used are: 861-885.
It’s important that you check your country’s legislation concerning radio broadcasting first. Most countries require a license for the GSM band. In our case, we can set the GSM band to unlicensed space and set a network name:
OpenBTS> config GSM.Radio.Band 1800GSM.Radio.Band changed from "900" to "1800"WARNING: GSM.Radio.C0 (51) falls outside the valid range of ARFCNs 512-885 for GSM.Radio.Band (1800)GSM.Radio.Band is static; change takes effect on restartOpenBTS>OpenBTS> config GSM.Radio.C0 870GSM.Radio.C0 changed from "51" to "870"GSM.Radio.C0 is static; change takes effect on restartOpenBTS>OpenBTS> config GSM.Identity.ShortName MyBTSName
Now we’re going to add new subscribers, so a mobile phone will be able to connect to OpenBTS. From the OpenBTS console, you can see which mobile phones were trying to subscribe, like:
OpenBTS>tmsisIMSI TMSI IMEI AUTH CREATED ACCESSED TMSI_ASSIGNED123456787890123 - 3210987654321 0 96h 6h 0123456787890124 - 4210987654321 0 95h 95h 0
Now you know the IMSI, you can use a tool called nmcli.py to add the subscribers:
cd workarea-openbts/openbts/NodeManagerpython2 ./nmcli.py sipauthserve subscribers create "phone1" IMSI123456787890123 6055551231 8430f55ba77243bf91cd0212bcbad52apython2 ./nmcli.py sipauthserve subscribers create "phone2" IMSI123456787890124 6055551231 edb70d6c162146bb87e366c0f72bcc9a
The first parameter is a unique name to identify the subscriber, the second is the IMSI code, which the tmsis CLI command listed. The IMSI can also be found on the SIM cardholder if you ordered OpenBTS preprogrammed SIM’s. The third parameter (MSISDN) is a unique arbitrary number within the network. We use the preferred phone number here. The last parameter is the Ki-code. This is a secret code stored on the SIM. It is used to encrypt GSM calls with using liba53. The Ki-code is also listed on the SIM cardholder if you ordered preprogrammed SIM’s. Calls are not encrypted if you omit this value, but you will be able to register.
Edit both sip.conf and extensions.conf and change the IMSI to the real values and restart Asterisk.
Testing mobile calls
Let’s see if two test mobiles can connect to OpenBTS (fingers crossed). Check your phone’s mobile operators setup and see if the network name (the short code) or a different unusual name (like testplmn) is listed between the operators. Pick the name and see if the phone can register on the network. Let’s test if we can send an SMS to the phone from the OpenBTS console:
sendsms 123456787890123 6055551232 Hi there!!!sendsms 123456787890124 6055551231 Hi there!!!
Now check if an SMS arrives from one mobile to the other. Keep an eye on the Asterisk console (using verbose logging). See if you can call 6055551232 from 6055551231. You now have your own BTS receiving and accepting calls with an Asterisk backend that routes your calls. In my current setup on an open workspace, the acceptable range seems to be about 10/20 meters. There are some settings which allows you to tweak the radio output, which can result in better radio traffic, but this is out of the scope of this article.
Browser calling
Now, let’s move on to the last part; calling from a browser to a mobile phone. I made an example SIP.js VoIP client so you don’t have to hack it yourself. Install like:
cdworkarea-openbts/git clone https://github.com/wearespindle/dialerjscddialerjs npminstallgulp jsscsswatch
Change the host variable in the source JavaScript at /src/index.js, so it connects to the right host. Open Chrome or Firefox on your LAN IP at the following port: https://123.123.123.123:8999/. Accept the self-signed insecure certificate. Also, check out if Asterisk’s HTTPS server is running on https://123.123.123.123:8089/httpstatus. Accept the certificate here. You will get an insecure response error in the browser if you try to connect to the Asterisk HTTPS/Websocket server if you don’t accept the certificate first!
The default password should match this article’s settings. Try to login as 1000 and see if you can make a call to 1111 or 6003. You should hear some audio. 6003 may require some additional music-on-hold settings in Asterisk. Watch the Asterisk console while you’re testing. Now try to call a mobile phone like 6055551231 or another browser client that’s logged in as 2000.
The browser uses SIP over a websocket to negotiate a DTLS-SRTP connection to Asterisk. You can also run the VoIP client in Electron if you have it installed:
npm run start
Now you also have a simple desktop VoIP client! It uses a setting to ignore self-signed certificates, so there is no need to accept the certificate here. SIP.js can also run in Node.js, so you can also create server-side VoIP clients if you would like to.
Lessons learned
So, that’s a wrap! I wouldn’t have thought that a browser could connect to a GSM over my own BTS when I got started! I hope you found this article useful. It sure was a lot of fun to hack on and a quite learningful experience to me! I learned some things during the process:
- SDR is how radio protocols will be shaped in the (near) future.
- OpenBTS seems a bit outdated, but it’s stable to run your own BTS on. I would also definitely dive into the Osmocom project to learn more about BTS software.
- I barely scraped the surface of new terms and knowledge that involves running OpenBTS. Especially when it comes to running multiple OpenBTS instances, handovers, etc..
- OpenBTS interacts nicely with out-of-the-box Asterisk.
- Asterisk is a versatile software project, able to connect several sources together in a flexible manner, as long it talks SIP and RTP.
- SIP.js is a very flexible and mature SIP client and makes it a breeze to make a WebRTC and websocket powered VoIP client.
I also didn’t know that after SIP negotiation over a websocket, the browser fires up a DTLS-SRTP connection straight to Asterisk. I always thought that the browser would indirectly be connected by using a websocket transport to some gateway to transfer the media to the final destination. To learn more about radio and SDR, I would highly recommend installing GNURadio:
cd ~/projects/radiomkdir workarea-gnuradiocdworkarea-gnuradiogit clone --recursive https://github.com/gnuradio/gnuradiocdgnuradiogit checkout v3.7.10.1mkdirbuildcd buildcmake../makesudomake installsudo ldconfig
I made an example project from other examples that’s using GNURadio to fire up a FM radio. Reception isn’t that good, but that’s probably because the antenna’s are optimized for GSM bandwidth.

Your thoughts
No comments so far